In this project, school-aged kids will learn to create agamograph art based on warm and cool colors. Weâve included free printable pages to make this project easy to complete at home or in the classroom.

Understanding Warm and COol Colors
Artists often use colors to better express feelings and emotions through their artwork. By using colors such as blue and green, artists can portray a cooler, calmer environment. Colors such as red, orange, and yellow tend to portray a warmer setting and more angry emotions.
Related Link – Begin learning about color theory with primary and secondary colors.
Supplies Needed to Make this warm & color colored agamograph Art Project

- Free Printable Pages – Download Below
- Blank Cardstock – for backing
- Crayon or Colored Pencils – in red, blue, and yellow colors only
- Scissors
- Glue – we used both stick and liquid glue
Download the Warm & Cool Colored Agamograph Printables Here
This printable download will give kids an opportunity to review the color wheel, learn about warm and cool colors, and save time from drawing the design elements themselves. Using these pages will allow kids more time to focus on the color theory aspect of the project and creating an agamograph.
This printable includes 4 pages:
- Warm & Cool Colors Color Wheel
- Fire and Ice Agamograph Images
- Agamograph Template – a base for cut agamograph images to be glued onto
- Optional: Blank Agamograph – where kids can create their own designs instead of using the fire and ice pages
Directions to Make warm & cool colored aGAMOGRAPHs
Step 1

Begin by completing the color wheel using only red, blue, and yellow. In the unlabeled portions of the color wheel, layer the two neighboring primary colors to discover a secondary color. For example, between red and yellow, kids color one layer of yellow followed by one layer of red to create the secondary color orange.
Tip: Blending colors will be easier if kids do not use much pressure when applying layers. Kids may wish to continue alternating the two colors until desired secondary color is reached.
Step 2

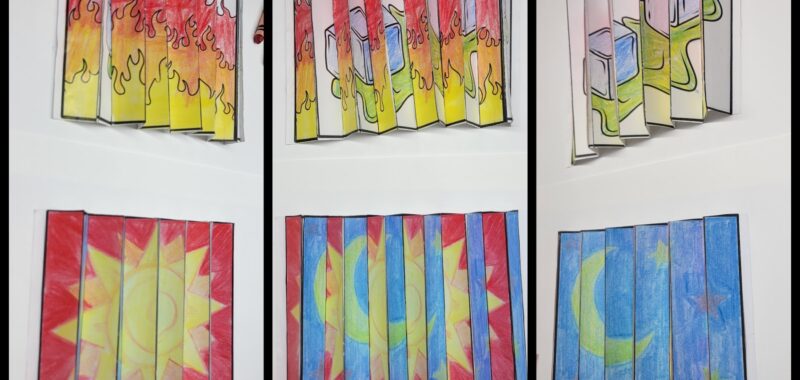
Using the color wheel as a reference, kids color 2 agamograph images. Color one image using only cool colors and the other using only warm colors.
Step 3

Use scissors to carefully cut along the vertical lines on colored agamograph images. Do not cut the numbers off of the strips. Kids need numbers attached to easily piece agamogaph together in the next step.
Step 4

Carefully align and glue colored, cut strips onto the agamograph template numbered 1-12.
Step 5

Next, fold the agamograph template along the vertical lines, alternating front and back folds with each line. This should make a paper fan style fold to create the agamograph illusion.
Step 6

Cut along the bottom and top horizontal lines to remove excess paper from agamograph. Important: Do not remove the small vertical strips of paper on the sides of the agamograph. These will be used in the mounting process.
Step 7

Next, apply glue to the blank vertical tabs at each end of the agamograph. Attach to cardstock. Then, place liquid glue under agamograph to help secure the center of the project. Allow project to fully dry before moving.
Finished Warm & Cool Colored agamograph Art Project

I am always amazed by agamographs! I love how this project combines opposites of both warm and cool colors and images. This is such a fun project that continues to entertain both the artist and viewer! Since these projects are made on paper, they are easily clipped, or displayed in your preferred style.
Our Experience Making this Warm & Cool Colored Agamograph Art Project
We had fun playing around with these agamographs. I love the option of letting kids choose their own designs. Also, having the printable with numbered paper slips really helped to keep our pieces in order.
Prep Time
5 minutes
Active Time
30 minutes
Total Time
5 minutes
Difficulty
Medium
Estimated Cost
$1
Materials
- Free Printable Color Wheel and Agamograph Pages
- Blank Cardstock â for backing
Tools
- Crayon or Colored Pencils â in red, blue, and yellow colors only
- Scissors
- Glue â we used both stick and liquid glue
Instructions
- Complete the color wheel using only red, blue, and yellow. In the unlabeled portions of the color wheel, layer the two neighboring primary colors to discover a secondary color. Tip: Blending colors will be easier if kids do not use much pressure when applying layers. Kids may wish to continue alternating the two colors until desired secondary color is reached.
- Using the color wheel as a reference, color 2 agamograph images. Color one image using only cool colors and the other using only warm colors.
- Use scissors to carefully cut along the vertical lines on colored agamograph images. Do not cut the numbers off of the strips. These are used to piece agamogaph together in the next step.
- Carefully align and glue colored, cut strips onto the agamograph template numbered 1-12.
- Next, fold the agamograph template along the vertical lines, alternating front and back folds with each line. This should make a paper fan style fold to create the agamograph illusion.
- Cut along the bottom and top horizontal lines to remove excess paper from agamograph. Important: Do not remove the small vertical strips of paper on the sides of the agamograph. These will be used in the mounting process.
- Apply glue to the blank vertical tabs at each end of the agamograph. Attach to cardstock. Then, place liquid glue under agamograph to help secure the center of the project. Allow project to fully dry before moving.
Notes
Warm & Cool Agamograph Art Variations
- Speed up the process by letting kids use secondary colored pencils or crayons (green, orange, and purple).
- Print templates on cardstock and use acrylic or other heavier mediums to complete. Note: cardstock does make folding a bit more difficult.
- Draw your own template and create agamographs in other sizes.
- Draw agamograph images themed around a holiday or season.
Other Fun cOLOr Theory Art Projects from Kids Activities Blog
Did your kids enjoy learning about warm and cool colors? Were they excited about their agamograph art?