This fun contour drawing lesson gives middle school and above aged kids a chance to work on hand-eye coordination while easing the pressure of perfection. This lesson always fills the room with laughter and can be done at home or in the classroom.

What is “Contour Drawing” in Art?
When artists focus on contour drawing, they are only looking at the outer edges and important features of their subject.
Artists may use quick contour sketches as a starting point for their drawings. It is an opportunity to get a base sketch on the paper. Artists can then easily adjust proportions and details from there.
In a blind contour drawing, the artist also refrains from looking at their paper while generally drawing in one continuous line.
Related: Use tracing to learn about contour lines in our One Line Drawing Project.
Supplies Needed for this Contour Drawing Art Project

- Blank Paper – a few pages per kid
- Random Objects – to draw
- Pen
- Pencil
- Coloring Supplies – crayons, colored pencils, etc.
Directions to Make a Contour Drawings Art Project
Step 1

Place a single object directly in front of the child for them to create a blind contour drawing. Looking at only the outer edges of the item, kids slowly draw one continuous line of what they see without looking at their paper. Remind them to use only one line and to imagine their pen is physically resting upon the item as their eyes move around it. Once kids have “traced” around the outer most edges of the item, they can then look at their drawing.
Step 2
Change objects and repeat Step 1. This is a fairly quick exercise so I tend to have many objects on hand and encourage kids to fit multiple drawings on a page. Continue to swap out objects and repeat step.
Step 3

Next, place two items together for kids to draw. Kids will still only draw the outer edges of the items, with one continuous line, as if the items were fused together. Swap items and repeat step as desired.
Step 4

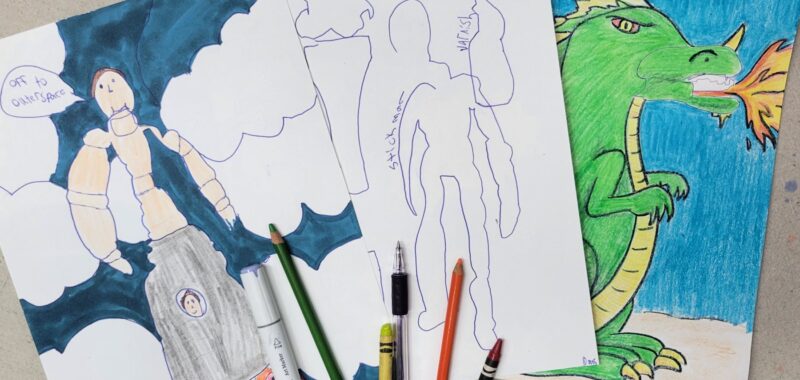
With a clean sheet of paper, kids choose a new object, or a favorite they have already drawn. This time, they can look at their paper as they draw a single line contour drawing. Once the contour line is drawn, kids look at their drawing and turn that outline into something completely different. Use crayons, colored pencils, markers, etc. to color their picture.
Finished Contour Drawing Art Project

I love how this project turns out. It gives kids a chance to let go of perfections and laugh about art. It is also an excellent project to enhance their hand-eye coordination and creativity.
Our Experience with Contour Drawings
This is one of my favorite assignments that I teach each year because it is quick and easy to put together and requires no skills! We always use pens simply to keep the kids from wanting to erase and “fix” their drawings. This exercise is to help kids focus on hand-eye coordination and drawing what they see, not what they think the object is supposed to look like.
I generally open the lesson by drawing a blind contour line (usually of an unbeknownst model) on the whiteboard. I do this while explaining the process to my students. It is a good ice breaker for them to see how even my drawing didn’t turn out perfectly, lowering expectations and encouraging laughter from the start.
Prep Time
5 minutes
Active Time
30 minutes
Total Time
35 minutes
Difficulty
Medium
Estimated Cost
$1
Materials
- Blank Paper – a few pages per kid
Tools
- Random Objects – to draw
- Pen
- Pencil
- Coloring Supplies – crayons, colored pencils, etc.
Instructions
- Place a single object directly in front of the child for them to create a blind contour drawing. Looking at only the outer edges of the item, kids slowly draw one continuous line of what they see without looking at their paper.
- Continue to swap out objects and repeat Step 1.
- Place two items together for kids to draw. Kids will still only draw the outer edges of the items, with one continuous line, as if the items were fused together. If desired, swap objects and repeat.
- With a clean sheet of paper, kids choose a new object, or a favorite they have already drawn. This time, they can look at their paper as they draw a single line contour drawing. Once the contour line is drawn, kids look at their drawing and turn that outline into something completely different. Use crayons, colored pencils, markers, etc. to color their picture.
Contour Drawing Art Project Variations
- Have students sit across from one another and do blind contour drawings of each other’s faces. This is a great introduction to portrait drawing. Having students draw one another also discourages them from looking at their paper. The other student can point out if they notice them looking down at their paper. Set a short timer and have students exchange partners where they are able to draw everyone in the room.
- Take contour drawing a step further by having kids draw with their non-dominant hand.
Other Art Projects from Kids Activities Blog
What was your child’s favorite item for blind contour drawing? Did they feel more confident in the method as they continued to practice?