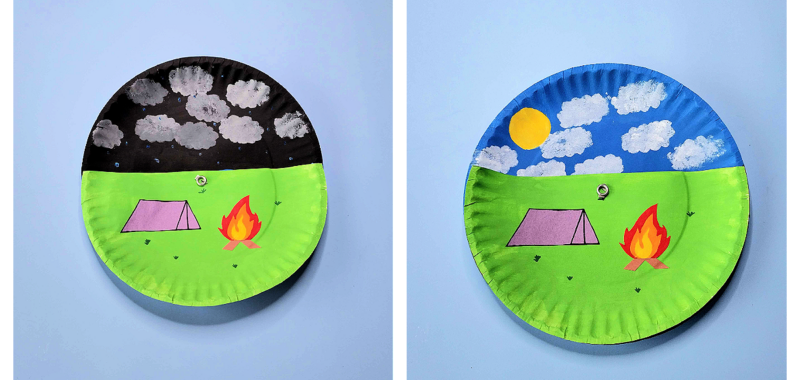
This is one of the coolest camping crafts! Kids can make their own campsite and a weather changing sky! Kids of all ages will love making this super neat craft. This budget-friendly camping craft is also easy to make so big kids and little kids alike can enjoy it. Is it sunny over your campsite or rainy? You decide! You can make this weather changing camping craft at home or in the classroom.

Weather Changing Camping Craft
This camping craft is not only fun to make, but let’s kids get creative. They can make a sunny sky full of white fluffy clouds or a dark rainy sky filled with gray clouds and shiny rain! And you can change it anytime you want!
My kids and I have been making a lot of camping crafts lately, and I wanted something that not only focused on them being creative and fine motor skills, but we were able to recreate an interesting memory from one of our camping trips!
This post contains affiliate links.
Related: Check out this super simple camper craft!
Supplies Needed For This Super Fun Camping Craft
- Paper Plates x2
- Acrylic Paints (Blue, White, Yellow, Black, Gray, Green)
- Paintbrushes
- Paper Fasteners
- Scissors
- Construction Paper (We used white, brown, and purple)
- Markers (Dark Green, Red, Yellow, Orange)
- Pencil
- Cotton Balls
- Glitter Glue (Blue)
How To Make This Super Neat Weather Changing Camping Craft
Step 1

Draw a line a little above the halfway point of your paper plate. Then cut across the line.

Paint it green.

Step 2

Paint your other paper plate. 1/2 of the paper plate should be painted blue and the other half black.
Step 3

Take your white paper and cut off a rectangle.

Draw a cloud.

Cut the cloud out using your scissors, and now you have a stencil. Do not draw the cloud too big.
Step 4

Use your cotton balls to dab clouds using your stencils on the painted paper plate.
We put gray clouds on the black side.

Don’t forget to add your rain by dabbing small drops of blue glitter glue onto the stormy side.
Step 5

Do the same thing with a clean cotton ball, but on the blue side. We used white paint for fluffy white clouds.

Don’t forget to add a sun.
Craft Note:
Paint the sun with the white paint first. Once dried then paint with the yellow, it’ll be more vibrant and the blue will not show through the yellow.
Step 5
Now let’s draw the tent on the purple construction paper.

Draw a triangle.

Draw 2 lines, one at the top of the triangle, one at the base. The base line should be longer than the top line.

Draw a diagonal line from the top line to the bottom.
Step 6
Cut the tent out and glue it to your green paper plate.
Step 7

Take your yellow marker and make almost a tear drop. Leaving one point on the left side, a gap, and a wavy point at the top.
Step 8

Now add the orange part of the flames. Outline the yellow part first, and then you’ll have a point on the left side, top, and right side. Color in the space once you have it drawn.
Step 9

Time for the red part of the flames. Outline the orange flames and this time you’re going to have 2 points on the left, 1 at the top, and 2 on the right. Make sure you color it in. Then you can cut out the fire.
Step 10

Cut out a small rectangle of brown construction paper. Cut out a small obtuse angle.

And then trim down the sides diagonally.

Glue the flames onto the wood and then the flames/wood to the grass.
Step 11

Using your dark green marker add some grass details and a dot in right below the cut line in the middle. Use your pencil to poke a hole through it.

Place it evenly on the blue/black paper plate and poke a hole through the hole into the back plate.
Step 12

Add your paper fastener.
Step 13

Change the weather!
Make This Camping Craft Your Own
We made this camping craft pretty simple. Mainly because my kids are little. But you can add all the details you want!
Instead of grass details you can add a leaf on the ground, pine cones, sand, maybe a tree with leaves and bark.
Draw extra camping gear around laying around the camp sight like binoculars, twigs and marshmallows and chocolate for smores, make a little camper instead of a tent. This camping theme craft is yours, so add anything you like.
Maybe you draw a cabin like at summer camp instead of a tent. This fun activity can be changed easily.
Our Experience With This Simple Camping Craft
So, I’ve seen people making various camping activities using sunny skies and night time skies. And they were cute! But I had an idea, why not recreate a camping trip we had that involved a rainy day! My kids had a blast not only using craft supplies to make it (they love painting), but we were reminded of a camping trip where it started out sunny, but rained, and rained.
Our tent was filled with water and it was an awful night. We packed the whole family up in the morning and dried off in the car. We were all upset, but when we finally dried off and stopped at IHOP for something hot, we were all laughing about the situation. A bad day turning into a great camping adventure that my kids still talk about.
Materials
- Paper Plates x2
- Acrylic Paints (Blue, White, Yellow, Black, Gray, Green)
- Paintbrushes
- Paper Fasteners
- Scissors
- Construction Paper (We used white, brown, and purple)
- Markers (Dark Green, Red, Yellow, Orange)
- Pencil
- Cotton Balls
- Glitter Glue (Blue)
Instructions
- Draw a line a little above the halfway point of your paper plate. Then cut across the line.
- Paint it green.
- Paint your other paper plate. 1/2 of the paper plate should be painted blue and the other half black.
- Take your white paper and cut off a rectangle.
- Draw a cloud.
- Cut the cloud out using your scissors, and now you have a stencil. Do not draw the cloud too big.
- Use your cotton balls to dab clouds using your stencils on the painted paper plate.
- We put gray clouds on the black side.
- Don’t forget to add your rain by dabbing small drops of blue glitter glue onto the stormy side.
- Do the same thing with a clean cotton ball, but on the blue side. We used white paint for fluffy white clouds.
- Don’t forget to add a sun.
- Paint the sun with the white paint first. Once dried then paint with the yellow, it’ll be more vibrant and the blue will not show through the yellow.
- Now let’s draw the tent on the purple construction paper.
- Draw a triangle.
- Draw 2 lines, one at the top of the triangle, one at the base. The base line should be longer than the top line.
- Draw a diagonal line from the top line to the bottom.
- Cut the tent out and glue it to your green paper plate.
- Let’s draw the campfire. Take your yellow marker and make almost a tear drop. Leaving one point on the left side, a gap, and a wavy point at the top.
- Now add the orange part of the flames. Outline the yellow part first, and then you’ll have a point on the left side, top, and right side. Color in the space once you have it drawn.
- Time for the red part of the flames. Outline the orange flames and this time you’re going to have 2 points on the left, 1 at the top, and 2 on the right. Make sure you color it in. Then you can cut out the fire.
- Cut out a small rectangle of brown construction paper.
- Cut out a small obtuse angle.
- And then trim down the sides diagonally.
- Glue the flames onto the wood and then the flames/wood to the grass.
- Using your dark green marker add some grass details and a dot in right below the cut line in the middle. Use your pencil to poke a hole through it.
- Place it evenly on the blue/black paper plate and poke a hole through the hole into the back plate.
- Add your paper fastener.
- Change the weather!
More Camping Crafts From Kids Activities Blog
How did your camping craft turn out? Do you prefer the sunny sky or the rainy sky?